Once you are aware of the right movements then it is time to practise them. Most people think that if they run through the correct movement enough then they will perfect the techniques. But the musicians that improve the fastest are the ones who concentrate each time they run through a technique and get it 100% right each time. This generally means that they start off learning the movement at a very slow pace (so slow that they can control all of their movements, even the involuntary ones). Using this method, as they work through the movements they can stop any incorrect tension or action as it starts to occur. This means they get rid of bad habits before they form. This also means that, if they are performing an action that needs the hands to do something unnatural, they are more able to complete the movement because at a slow speed it is much easier to make the hands work in unfamiliar ways.
Once we have all of the right parts behaving in the correct manner we need to be focused on making sure we perform the techniques the correct way each time we perform them. This will train the muscles to remember them and if we do them the same way (the correct way) each time then we will master them a lot faster and miss out on those long hours of fruitless practise. Once we are comfortable and in control of the action we can then move on to try and complete them at a faster tempo.
This is best done with a metronome (a time keeping device - a link for an online version of this can be found on our website under Student Resources). Set the metronome to a tempo at which you are able to perform the technique easily and perfectly. Once you have gone through the movements at this tempo and have performed them correctly three or four times then increase the speed slightly. At the start you may be able to perform the movement well, and you may find yourself doing it at a much faster tempo then you had started off but eventually you will get to the point where you might have to stay at a certain tempo for a while (even a few weeks) until you can comfortably get it right each time. Keep going with this method until you have achieved the desired speed but before you move on to a faster tempo make sure you are executing the movements correctly.
The last thing and another important factor is the question of how much time you should spend practising. And how long you should do it for? For the best results, practise as often as you can sometimes a few times a day. You may think you don’t have time to practice several times a day. But now we will consider how long you should practice for. This varies from person to person but you want to be practising for as long as you can without losing focus on controlling the actions. For some people this is 20 minutes but for the vast majority this is only 1-5 minutes. If you are daydreaming or thinking about something else then you will not be focused on being perfect. If this is the case, stop playing and do something else for a few minutes then return to practising once you are refocused. Many small practice sessions are infinitely better than one or two long sessions.
I have spent years learning, teaching and performing and I have seen some truly great musicians applying these techniques and reaping the benefits of this method. I am sad to say that I have also seen lesser musicians ignore or avoid this method and never progress or, if they do progress, they do so at a much slower rate. Try to run through something that you find difficult now and if you adhere to this method you will see visible results and improvement very quickly.
www.12strings.com.au
www.12strings.com.au/piano.html
www.12strings.com.au/guitar.html
www.12strings.com.au/bass.html
www.12strings.com.au/ukulele.html

Thursday, July 7, 2011
So you want to play solos?
So you want to play solos? Where do you start? What skills do you need to have? What do you need to know? How do I look cool doing it?
This is one of the most common questions that I am asked in lessons and the best answer is the good old tried and true K.I.S.S principle. understand what is needed and play it. Easy right? Not always but we will look at a few things that will help you on your way to playing great solos.
Now people always say you need to be at an advanced level to play solos. This is not true obviously if you are at an advanced level then you will be capable of playing a more difficult solo but this is no indication of weather the solo is good or not. The best example of this is “Mary had a little Lamb”. Four notes played at a steady pace without a lot of fanfare. Now this piece would only present a challenge to a very small group of people but most people would be able to play it fairly easily and quickly. Now the thing about this tune is it is memorable, sounds pleasing to the ear, and is recognisable. This is a great example of a solo.
First things first. We need a basic understanding of how chords sound with the notes we play. If you play one note over particular chord it may sound great but if you play another note it could end up sounding really bad. The reason why is that some notes just don't sound good together. How do I know what notes will work over what chords? Now we could get a friend to play a bunch of chords while you check and see what notes will work. Or an easier way would be to learn some scales and know what keys you can play them over.
Now before we jump in and learn a whole bunch of scales we need to understand what a key is. The best way to describe a key is to look at it like it is a bunch of notes that sound good together. This means that if we are playing the notes from a key and the chords that we are playing over are from the same key then theoretically this should sound good.
So what keys should we learn first? Well the best type of scale to start with is the Pentatonic scale. The reason why is because it only has five notes in it. So on any Instrument it is fairly easy to learn where five notes are on any instruments. I like to teach people three scale shapes and how they link together.
These shapes need to be learned so well that regardless of what note you are fretting you will be able to see how they link to the other two scales. You need to be comfortable linking them moving up the neck (towards the bridge) as well as moving down the neck (towards the headstock).
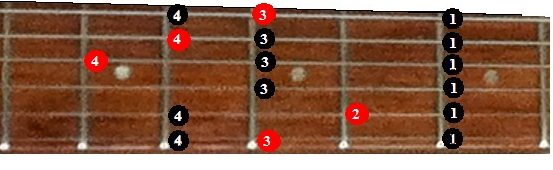
The scale shapes used here have two different colours marked on each shape. At first we will be focusing on the ones in black. These notes are the notes that most easily fit over the chords we will be using. Once you are comfortable using the black notes you can start to incorporate the red ones.
The numberings refer to which fingers should be used to fret the notes. For ease of reference, you should imagine that the guitar headstock is to the right-hand-side of the page and the first (high E) string is at the bottom of the diagrams.
These shapes are moveable and can be played anywhere on the fretboard. For best results, try to play them in as many positions as possible. Remember, the more thoroughly you learn these shapes, the easier it will be to use them in solos.
The first thing we need to do is learn the scale shapes and how they are linked. These shapes need to be learned so well that regardless of what note you are fretting you will be able to see how they link to the other two scales. You need to be comfortable linking them moving up the neck (towards the bridge) as well as moving down the neck (towards the headstock).
1. Minor shape one: The second note of this scale is the same as the first note of the next scale

2. Major shape: The third note of this scale is the same as the first note of the next scale.

3. Minor shape two: The second note of this scale is one tone (two frets) from the first note of the fist scale. If the second note of this scale is on the 7th fret then the first note of the first scale will be on the 9th fret.

Now that you are familiar with the shapes and how they are linked, you need to find some note groupings that you like. A good solo is recognisable - you can hum along to it and most of the more memorable licks are very simple. Try to focus on a single idea with only four or five notes and then use the techniques mentioned earlier in this book to enhance them. You can also add other notes from the scale shapes to give it some variety. The more you do this the better you will get.
The key to playing good solos and creating great licks is to focus on the melody or tune you are trying to play. The stronger this is, the better your solos will be. Always hear the tune in your head and then try to replicate it on your guitar. If you can do this then you will be well on your way to playing guitar solos.
And this is just the beginning. Once you are fluent using the black and red notes while playing along with the CDs, experiment with using other notes outside the scale shapes to see how they sound. There are 12 notes that can be used in music – so why limit yourself to just five or seven?!
www.12strings.com.au
www.12strings.com.au/piano.html
www.12strings.com.au/guitar.html
www.12strings.com.au/bass.html
www.12strings.com.au/ukulele.html
This is one of the most common questions that I am asked in lessons and the best answer is the good old tried and true K.I.S.S principle. understand what is needed and play it. Easy right? Not always but we will look at a few things that will help you on your way to playing great solos.
Now people always say you need to be at an advanced level to play solos. This is not true obviously if you are at an advanced level then you will be capable of playing a more difficult solo but this is no indication of weather the solo is good or not. The best example of this is “Mary had a little Lamb”. Four notes played at a steady pace without a lot of fanfare. Now this piece would only present a challenge to a very small group of people but most people would be able to play it fairly easily and quickly. Now the thing about this tune is it is memorable, sounds pleasing to the ear, and is recognisable. This is a great example of a solo.
First things first. We need a basic understanding of how chords sound with the notes we play. If you play one note over particular chord it may sound great but if you play another note it could end up sounding really bad. The reason why is that some notes just don't sound good together. How do I know what notes will work over what chords? Now we could get a friend to play a bunch of chords while you check and see what notes will work. Or an easier way would be to learn some scales and know what keys you can play them over.
Now before we jump in and learn a whole bunch of scales we need to understand what a key is. The best way to describe a key is to look at it like it is a bunch of notes that sound good together. This means that if we are playing the notes from a key and the chords that we are playing over are from the same key then theoretically this should sound good.
So what keys should we learn first? Well the best type of scale to start with is the Pentatonic scale. The reason why is because it only has five notes in it. So on any Instrument it is fairly easy to learn where five notes are on any instruments. I like to teach people three scale shapes and how they link together.
These shapes need to be learned so well that regardless of what note you are fretting you will be able to see how they link to the other two scales. You need to be comfortable linking them moving up the neck (towards the bridge) as well as moving down the neck (towards the headstock).
The scale shapes used here have two different colours marked on each shape. At first we will be focusing on the ones in black. These notes are the notes that most easily fit over the chords we will be using. Once you are comfortable using the black notes you can start to incorporate the red ones.
The numberings refer to which fingers should be used to fret the notes. For ease of reference, you should imagine that the guitar headstock is to the right-hand-side of the page and the first (high E) string is at the bottom of the diagrams.
These shapes are moveable and can be played anywhere on the fretboard. For best results, try to play them in as many positions as possible. Remember, the more thoroughly you learn these shapes, the easier it will be to use them in solos.
The first thing we need to do is learn the scale shapes and how they are linked. These shapes need to be learned so well that regardless of what note you are fretting you will be able to see how they link to the other two scales. You need to be comfortable linking them moving up the neck (towards the bridge) as well as moving down the neck (towards the headstock).
1. Minor shape one: The second note of this scale is the same as the first note of the next scale
2. Major shape: The third note of this scale is the same as the first note of the next scale.

3. Minor shape two: The second note of this scale is one tone (two frets) from the first note of the fist scale. If the second note of this scale is on the 7th fret then the first note of the first scale will be on the 9th fret.

Now that you are familiar with the shapes and how they are linked, you need to find some note groupings that you like. A good solo is recognisable - you can hum along to it and most of the more memorable licks are very simple. Try to focus on a single idea with only four or five notes and then use the techniques mentioned earlier in this book to enhance them. You can also add other notes from the scale shapes to give it some variety. The more you do this the better you will get.
The key to playing good solos and creating great licks is to focus on the melody or tune you are trying to play. The stronger this is, the better your solos will be. Always hear the tune in your head and then try to replicate it on your guitar. If you can do this then you will be well on your way to playing guitar solos.
And this is just the beginning. Once you are fluent using the black and red notes while playing along with the CDs, experiment with using other notes outside the scale shapes to see how they sound. There are 12 notes that can be used in music – so why limit yourself to just five or seven?!
www.12strings.com.au
www.12strings.com.au/piano.html
www.12strings.com.au/guitar.html
www.12strings.com.au/bass.html
www.12strings.com.au/ukulele.html
Subscribe to:
Posts (Atom)